
Only about 4% of residential garages have coated floors, so the first decision isn't which color looks best. It's whether the coating system matches your slab, moisture conditions, and intended use, as reflected in current garage floor market coverage.
You're probably standing in the garage with three contractor quotes open on your phone, comparing flake colors and wondering whether epoxy or polyaspartic is the smarter choice. That's the wrong starting point. A garage floor can look excellent on installation day and still peel, blister, or pick up under hot tires if the contractor never diagnosed the concrete underneath.
A good garage floor painters contractor earns the job before opening a coating kit. The contractor should identify the slab's history, test for moisture, mechanically profile the concrete, repair defects, and specify a coating build that the prepared surface can support. Product selection comes after that.
Why Your Garage Floor Decision Starts Before the Color Swatch
Consider a typical Stamford garage with a poured concrete slab from the 1990s. For decades, that floor may have absorbed snowmelt, road salt, oil drips, and repeated freeze-thaw exposure near the garage door. It may also carry an old sealer, paint residue, patching compound, or a coating that a previous owner installed without proper preparation.
A decorative flake broadcast can hide stains. It can't correct vapor pressure, weak concrete, contamination, or a smooth surface that gives the coating nothing to grip. If a contractor starts by showing you color chips and never asks about slab history, you're discussing the finish before you know whether the floor can hold it.
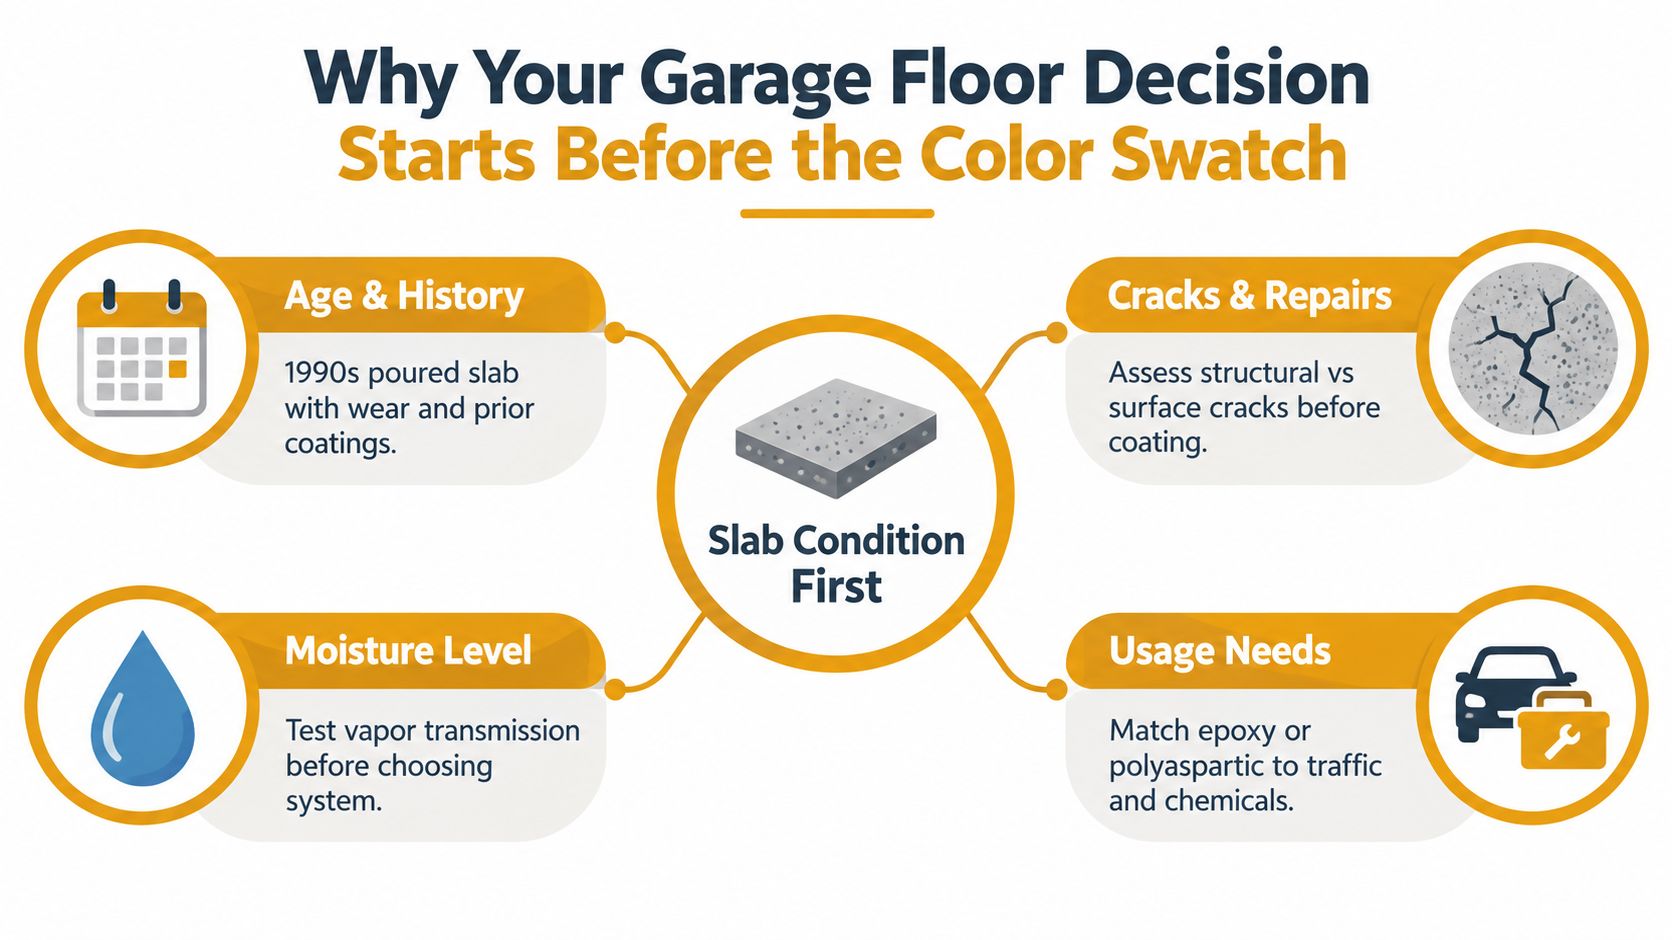
Three questions come before color
Start with the slab itself. Age matters because older concrete can include repairs, surface wear, weak laitance, and unknown mix characteristics. A contractor should inspect for scaling, spalls, exposed aggregate, control joints, and areas that sound hollow.
Next, identify anything already on the floor. Paint, curing compounds, sealers, and old epoxy can interfere with adhesion. A serious installer won't assume that a pressure washer or acid wash has removed them. Mechanical preparation exposes what the slab can support.
Then investigate moisture history. Spring thaw, foundation drainage, a high water table, an attached basement, and previous vapor issues can all change the specification. Dark patches, efflorescence, blistering, and damp edges deserve investigation before anyone recommends a primer.
The right contractor should also ask how you use the garage. A workshop with solvents and heavy tool traffic needs a different conversation than a clean storage garage where minimizing downtime matters most.
Practical rule: The slab determines the coating menu. Don't let the color card determine the system.
A useful example is this garage floor project image, but remember that a finished-floor photograph shows appearance, not moisture readings or adhesion preparation. The history and diagnostics stay invisible after installation, yet they control whether that appearance lasts.
Epoxy has deep industrial roots. The first epoxy resins were synthesized independently in Germany and Switzerland in the late 1930s, and epoxy floor coatings became established in industrial environments by the 1960s and 1970s because of chemical and abrasion resistance. Residential garage kits arrived later, followed by newer polyaspartic polyurea systems that expanded into homes, patios, basements, and pool decks, as described in this history of epoxy coatings.
That history explains the central point. These materials can perform well, but only when the installer matches chemistry, profile, moisture tolerance, and use conditions. Prep grade and slab diagnostics come first. The finish comes second.
Comparing Epoxy, Polyaspartic, Polyurethane, and Acrylic Coatings
Homeowners often hear “epoxy,” “polyurea,” “polyaspartic,” and “polyurethane” used as if they're interchangeable. They aren't. Each family has different working characteristics, surface requirements, UV behavior, and tolerance for installation mistakes.
For a Connecticut garage, I usually compare systems in this order: slab moisture, preparation profile, required build, exposure to sunlight and chemicals, and the time available before the garage must return to service. A fast cure doesn't rescue a contaminated or damp slab.
How the systems differ
100% solids epoxy provides a substantial build and strong resistance to petroleum products, solvents, acids, and household chemicals when properly specified. It works well as a body coat on a mechanically prepared slab and gives the installer time to broadcast decorative flakes evenly. Its weaknesses include longer cure requirements, potential yellowing with UV exposure, and poor performance when moisture or surface contamination remains unresolved.
Water-based epoxy is easier to handle and can suit a lightly used garage with a sound slab. It generally produces a thinner film and is less forgiving where hot tires, salt, standing water, or chemical exposure are routine. I wouldn't use it as a default premium recommendation for a heavily used Connecticut garage.
Polyaspartic and polyurea systems cure quickly, resist sunlight better than standard epoxy formulations, and can reduce downtime. They're attractive for homeowners who need the garage back quickly. They also demand disciplined timing, careful mixing, correct slab temperature, and excellent preparation. In an unheated garage with a cold slab, a contractor who oversells a fast-cure system can create an adhesion problem instead of solving a scheduling problem.
Polyurethane topcoats are often used over an epoxy or polyurea base rather than as a complete system by themselves. They can add abrasion resistance, chemical resistance, and improved UV stability. The topcoat still depends on the bond and cleanliness of the layers beneath it.
Latex or acrylic garage floor paint is the budget option, not a substitute for a high-build coating system. It can refresh a clean, lightly used floor, but hot tires, road salt, moisture, and repeated abrasion expose its limitations quickly. If the goal is long-term protection, acrylic paint is where many homeowners save money twice, first on installation and later on removal and rework.
| Coating System | Typical Thickness | Cure to Traffic | Best Application |
|---|---|---|---|
| 100% solids epoxy | High-build system | Longer cure window | Prepared slabs needing chemical and abrasion resistance |
| Water-based epoxy | Thin to moderate film | Moderate cure window | Light-duty garages with sound concrete |
| Polyaspartic or polyurea | Moderate to high build | Fast cure when conditions are suitable | Projects where downtime matters and prep is excellent |
| Polyurethane topcoat | Thin protective layer over a base coat | Depends on full system | UV, abrasion, and chemical protection |
| Latex or acrylic paint | Thin film | Often quick initial return | Cosmetic refreshes on lightly used floors |
Match the coating to the prep grade
A thin acrylic layer doesn't need the same mechanical profile as a high-build broadcast system. The contractor should specify the preparation profile and coating build together, not present them as unrelated choices.
For a two-car attached garage with ordinary vehicle use, I'd consider a moisture-tolerant epoxy primer where testing and product data support it, followed by a compatible polyaspartic topcoat. That isn't a universal prescription. If the slab fails moisture testing or contains widespread weak concrete, the system must change, and coating may not be the right answer.
How Surface Prep and ICRI Profiles Drive Adhesion
A coating bonds mechanically to the concrete surface. The installer creates that bond by removing contaminants and opening the slab to a controlled texture. “We cleaned it and made it rough” isn't a specification.
The International Concrete Repair Institute's Concrete Surface Profile system gives contractors a common way to describe that texture. The required profile depends on the thickness and type of coating being installed. Thin sealers need less texture than a high-build system, while overlays require a substantially heavier profile.
The preparation sequence
A competent crew normally follows a sequence that looks like this:
Empty and degrease. Remove stored items, sweep loose debris, and clean oil, tire residue, salt, and other contaminants. Degreasing isn't the final preparation step. It only makes mechanical profiling more effective.
Inspect and test the surface. The contractor should identify weak concrete, old coatings, cracks, spalls, and repairs before selecting tooling or repair materials.
Mechanically profile the slab. Diamond grinding removes surface contamination and creates a consistent texture. Shot blasting removes the surface layer through abrasive impact and can be effective on larger open areas. Both methods can be connected to dust-control equipment.
Repair defects. Cracks, pits, spalls, and damaged edges need compatible repair materials. A coating may bridge a hairline surface imperfection, but it won't stop movement in a structural crack or hide a failing repair.
Vacuum and prime. Dust left on the floor becomes a bond-breaker. The prepared surface should be cleaned thoroughly before the primer or base coat is applied.
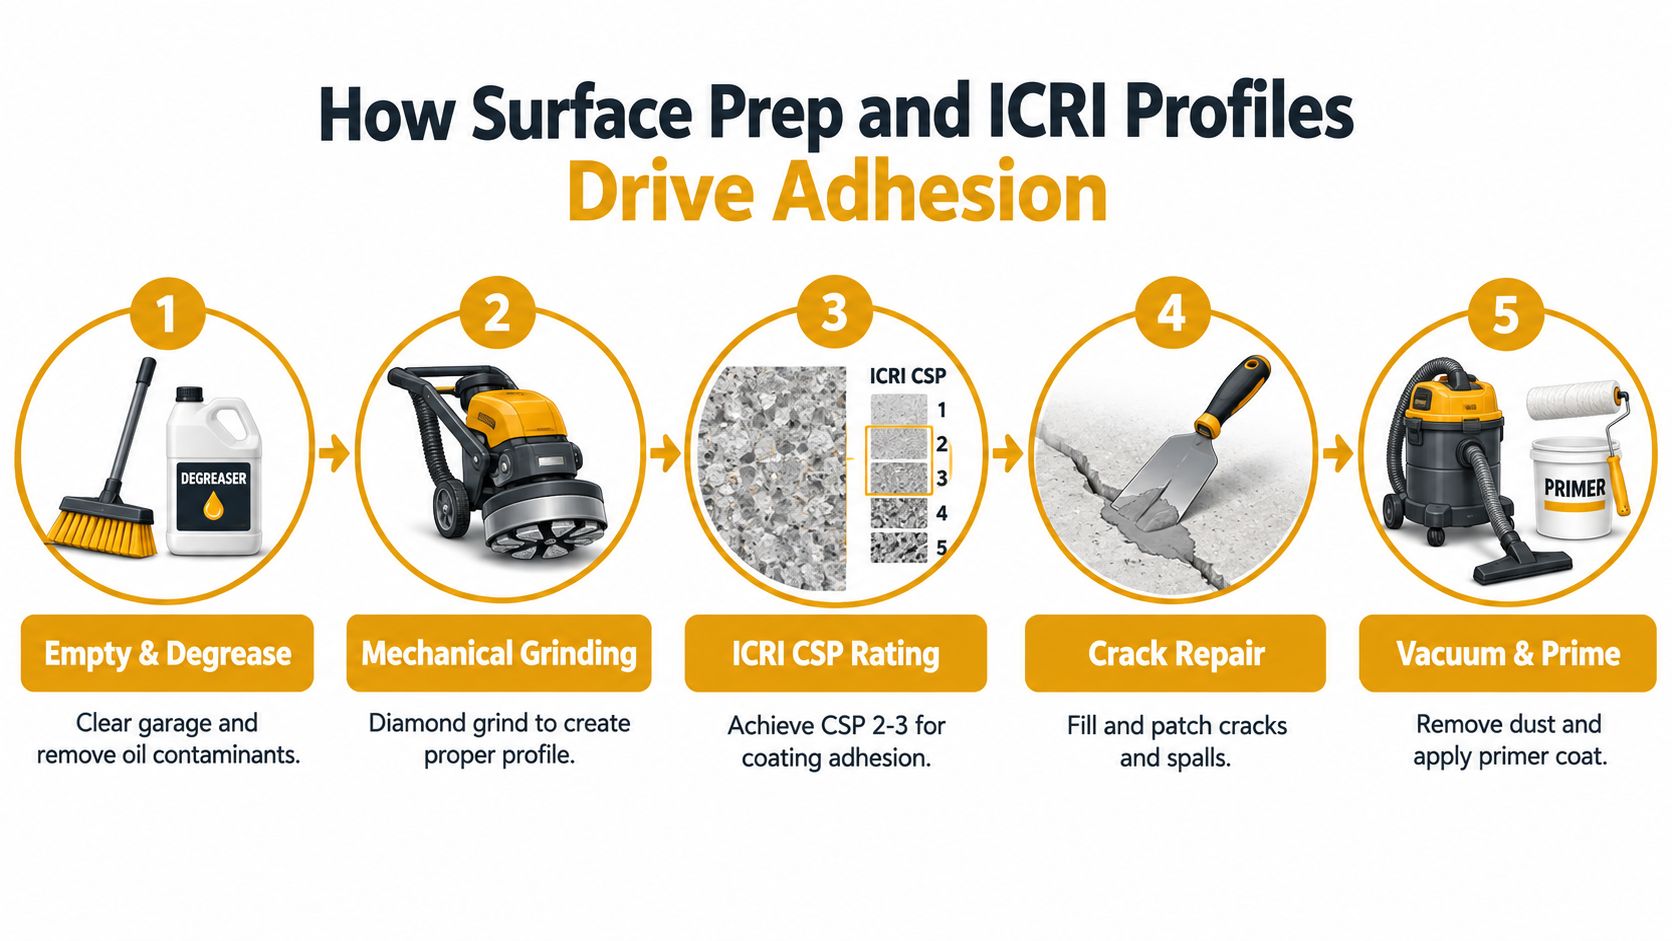
CSP should appear in the estimate
For thin coatings around 4 to 5 mils, ICRI CSP 3 is commonly specified. Thicker 15 to 50 mil systems commonly use CSP 4 to CSP 5, while heavier profiles are reserved for overlays, according to industry guidance on concrete surface profiles.
That matters because a contractor can recommend a premium resin and still install it over the wrong surface texture. CSP 2 may suit thin acrylics and sealers in some specifications, while a high-build broadcast system usually needs a more open mechanical profile. The installer should explain the target profile, how it will be achieved, and how it will be checked.
Acid etching has a place in limited situations, but I wouldn't accept acid etching alone as the preparation plan for an older Connecticut slab with oil, salt, old sealer, and unknown repairs. Acid doesn't reliably remove every contaminant, and it doesn't provide the same controlled result as mechanical profiling.
Control joints require judgment. Some should remain visible and be honored as movement points. Others may receive a flexible joint treatment or compatible filler, depending on the system and the joint's function. Filling every joint with rigid material is not automatically an upgrade.
A bid that doesn't name the preparation method and target CSP profile hasn't described the adhesion plan.
After cure, pull-off adhesion testing under ASTM D7234 or ASTM D4541, where applicable, provides a verification benchmark. Most residential jobs won't receive formal testing, but a contractor who understands these standards should still be able to explain how preparation quality is evaluated.
Moisture Testing the Slab Before Any Coating Goes Down
Moisture testing is a gate, not an optional add-on. A contractor who quotes a coating system without asking how moisture will be measured is guessing about the most common cause of peeling, blistering, and disbondment.
Two ASTM methods answer different questions. ASTM F1869 calcium chloride testing measures moisture vapor emission from the slab surface. The test typically runs for 60 to 72 hours and reports moisture vapor emission rate in pounds per 1,000 square feet per 24 hours. ASTM F2170 in-situ relative humidity testing uses probes installed into the concrete, equilibrated for about 72 hours, to measure moisture deeper in the slab.
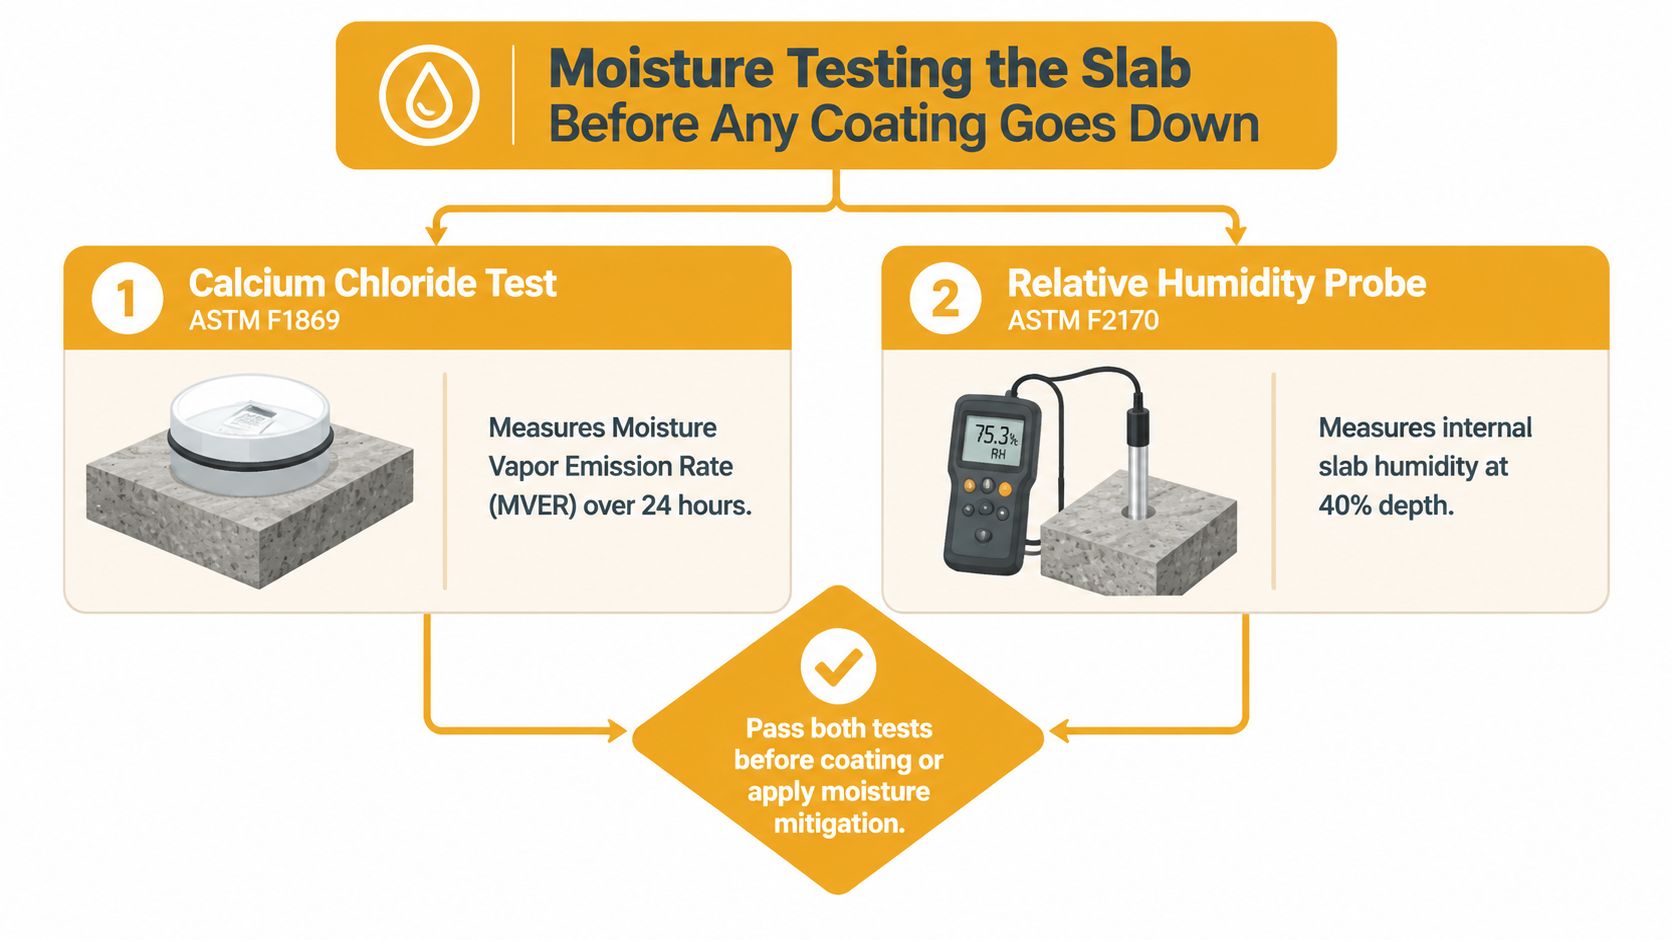
The numbers change the specification
Common thresholds for standard epoxy systems are around 3 lb per 1,000 square feet per 24 hours for MVER or 75% RH, as explained in technical guidance on concrete moisture testing. Product manufacturers may specify different limits, so the contractor must compare the readings with the actual data sheet for the proposed system.
A slab that exceeds the limit isn't automatically unusable. The contractor may specify a vapor-mitigation primer, a moisture-tolerant epoxy, or a different preparation and coating plan. If moisture is high across much of the slab, the honest recommendation may be to delay coating until the source is addressed or choose another finish, such as concrete polishing.
What homeowners can observe
You can look for warning signs before the contractor arrives:
- Darkening under plastic: Condensation or darkened concrete beneath taped plastic suggests moisture movement, though this informal check doesn't replace ASTM testing.
- Efflorescence: White mineral deposits indicate water has moved through the concrete and carried salts toward the surface.
- Blisters near walls: Vapor pressure can show up at slab edges and wall bases, especially where drainage or foundation conditions are poor.
- Spring-thaw changes: A garage that smells damp or develops visibly higher humidity during snowmelt deserves more scrutiny.
The slab's age, any pour-over or resurfacing layer, foundation drainage, and the garage's position relative to grade all affect the risk. A newly installed top layer can look dry while moisture remains below it.
If testing fails, don't let a contractor solve the problem by applying a faster coating. DT Industrial Flooring's technical FAQ reflects the broader diagnostic point, moisture-tolerant primers and formal testing matter because coating brand alone doesn't control vapor transmission.
What Garage Floor Painters Contractors Actually Charge in CT
Connecticut pricing varies because contractors aren't all selling the same scope. A low quote may cover a quick clean and one thin coat, while a higher quote may include mechanical grinding, crack repair, primer, decorative broadcast, a protective topcoat, and moisture mitigation.
The ranges below are useful comparison points for 2026, not promises. The actual price depends on the floor's condition, access, edges, repairs, selected build, and the contractor's written warranty.
| Coating System | Installed Cost per Sq Ft | Typical 2-Car Garage Range | What's Usually Included |
|---|---|---|---|
| Solid-color epoxy | $4 to $7 | $1,400 to $3,500 | Preparation, epoxy base or body coat, and protective finish |
| Full broadcast flake | $6 to $10 | $1,400 to $3,500 | Mechanical preparation, base coat, full flake broadcast, scrape, and topcoat |
| Polyaspartic topcoat system | $7 to $12 | $1,400 to $3,500 | Prepared slab, compatible base system, fast-cure topcoat |
| Metallic or quartz system | $9 to $15+ | $1,400 to $3,500 | Decorative build, specialty aggregate or pigment, and protective finish |
These figures reflect the pricing ranges supplied for this guide. They should be read as a way to compare scope, not as a substitute for a site inspection.
Read every line of the estimate
A professional estimate should identify:
- Preparation: Diamond grinding, shot blasting, dust control, and cleanup.
- Profile: The target ICRI CSP profile and how the crew will verify it.
- Repairs: Crack, spall, pit, edge, and joint treatment.
- Coating build: Primer, body coat, broadcast aggregate, and topcoat.
- Moisture response: Testing method and any mitigation product.
- Return to service: Cure requirements for foot traffic, vehicles, and chemicals.
- Warranty: Labor coverage, product coverage, exclusions, and maintenance duties.
A quote that says “epoxy floor, complete” leaves too much unanswered. Two contractors can use the same word while proposing entirely different film thicknesses and preparation standards.
Price warning: A one-day polyaspartic installation over an unprepared slab isn't a bargain. It's an unresolved liability.
Edge work also matters. Stem walls, steps, drains, garage-door aprons, and tight transitions add labor and detail. Extensive crack repair or moisture mitigation can change the specification substantially. Ask the contractor to identify exclusions before signing, especially repairs discovered after grinding.
The cheapest bid deserves extra questions, not an automatic yes. If the estimate omits testing, profiling, repairs, or a defined topcoat, compare the missing work before comparing the totals.
Vetting Garage Floor Painters Contractors With a Real Checklist
A contractor can sound polished and still provide a weak installation. Vetting should focus on records, process, and accountability, not just online photographs or a colorful sample board.
Connecticut homeowners have a practical starting point. For work over $200 on an owner-occupied property, the contractor should hold active Home Improvement Contractor registration with the Connecticut Department of Consumer Protection. Connecticut doesn't operate a single statewide painting or flooring license that replaces this registration. HIC registration is not the same thing as a full general contractor license, so ask what registration applies to the work being proposed.
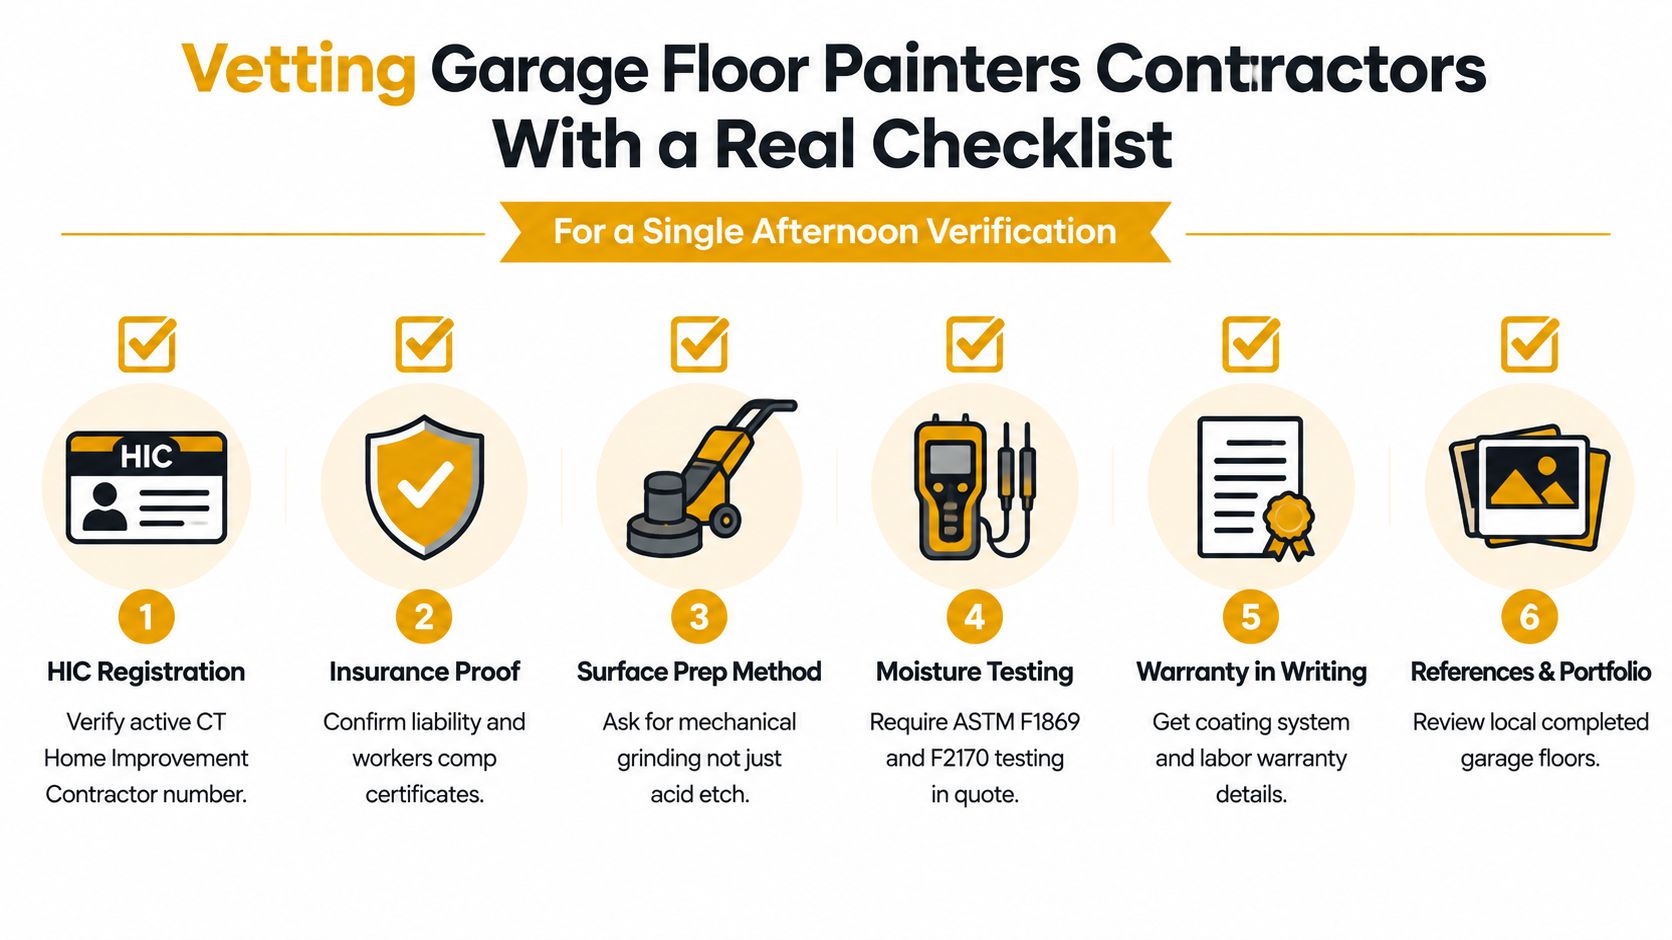
Verify the company before discussing colors
Registration comes first. Ask for the company's HIC number and verify it through the Connecticut Department of Consumer Protection. The number should appear on the contract and required business paperwork, and the contractor's vehicles should display the registration information as required.
Request insurance directly. Ask for current certificates of general liability and workers' compensation insurance, preferably sent directly by the carrier or agency. Don't rely on a verbal assurance. The coverage should apply to the business and crew performing the work.
Search complaint records. Use the Department of Consumer Protection's available complaint and registration information, then review the business across more than one platform. Read the substance of complaints. Repeated disputes about prep, change orders, scheduling, or warranty response matter more than a single star rating.
Ask for older references. Request three completed garage floors, including projects old enough to show how the system handles normal use over time. Ask each homeowner whether the contractor documented moisture, explained preparation, arrived with the promised crew, and returned calls after payment.
Ask questions that force a technical answer
Weak installers hide behind product names. Strong installers explain the process.
Who will run the crew? Find out whether the salesperson, owner, or subcontracted crew will control the installation. Ask who handles repairs, mixing, and final inspection.
What preparation method and CSP profile will you use? “We grind the floor” is incomplete. Ask what equipment is used, what profile the coating requires, and how dust will be controlled.
Which moisture test will you perform? The estimate should identify ASTM F1869, ASTM F2170, or both, along with the product's moisture limits and the response to a failed reading.
What does the exclusions clause say? Ask specifically about moisture, delamination, yellowing, hot-tire pickup, moving cracks, chemical damage, and damage caused by another contractor.
How are change orders priced? Crack repair and substrate problems should be discussed before work begins. If grinding reveals a hidden coating or weak concrete, the contract should explain how additional work gets approved and priced.
Treat the warranty as a technical document
“Lifetime” has no value until you know what it covers. Ask whether the warranty applies to labor, materials, or both. Confirm the duration, who backs it, what maintenance is required, and how you submit a claim.
Read exclusions carefully. A warranty may exclude moisture-related failure, movement in the slab, hot-tire pickup, chemical exposure, UV yellowing, impact, or work performed by another contractor. Those exclusions may be reasonable, but the installer should disclose them before you sign.
A warranty that excludes the failure modes you're most worried about is a sales phrase, not meaningful protection.
Understand permits and paperwork
A coating-only installation over an existing slab often doesn't trigger a building permit in Connecticut towns. Local rules can change when the scope includes slab repairs, drainage modifications, structural work, or work near a regulated wetland setback. Ask the building department in the town where the property is located instead of relying on a contractor's assumption.
Keep a complete project file:
- Written contract: Scope, payment schedule, start conditions, and completion terms.
- HIC documentation: Registration number on the contract and related paperwork.
- Insurance certificates: Liability and workers' compensation records.
- Product data sheets: Primer, base coat, aggregate, and topcoat.
- Moisture records: Test method, locations, readings, and product thresholds.
- Preparation record: Target CSP, repairs completed, and photographs before coating.
- Warranty documents: Coverage, exclusions, claim process, and maintenance instructions.
- Change orders: Written approvals and final pricing.
The Home Improvement Guaranty Fund may provide a potential avenue of recourse when a registered contractor fails to deliver, subject to the fund's rules and eligibility requirements. It isn't a replacement for checking references, insurance, and contract language before work begins.
CP Painting Company's project image and company mark can be part of a contractor's portfolio review, but every installer should still answer the same questions about moisture, preparation, coating build, and warranty coverage.
Your Action Plan for Hiring Garage Floor Painters Contractors
A good hiring process doesn't need to be complicated. It needs to happen in the right order.
Week one
Document the floor before calling contractors. Write down the approximate slab age, any previous coating or sealer, visible cracks, oil stains, damp areas, efflorescence, and changes you notice during spring thaw. Clear enough of the garage for a contractor to inspect the edges, joints, walls, and door apron.
Ask each contractor whether they provide formal moisture testing. You can perform a simple observation check with taped plastic, but don't treat it as a pass or fail. The professional decision should rely on the applicable ASTM process and the product data sheet.
Week two
Request three written bids. Each one should name the coating family, expected thickness, preparation method, target CSP profile, crack and joint treatment, moisture test, mitigation plan, cure requirements, and warranty.
Don't accept three versions of “garage floor epoxy.” Ask each contractor to explain what happens if the slab fails moisture testing or grinding reveals weak concrete. Their answer tells you more than the color selection process.
Week three
Verify the contractor's Connecticut HIC registration and request current insurance certificates. Contact references from older installations, not only recent projects. Ask whether the completed floor has experienced peeling, blistering, hot-tire pickup, yellowing, or difficult warranty service.
Save the contractor's product data sheets and proposed warranty before you authorize work. If the salesperson won't provide them, remove that bid from consideration.
Week four
Finalize the contract only after the technical details are written down. Include the moisture threshold, test method, preparation profile, repair allowance, cure time, warranty exclusions, change-order procedure, and payment schedule.
Before signing, require three essential items:
- A passing moisture result on file, or a written mitigation specification tied to the actual readings.
- A defined preparation profile matched to the coating thickness and verified before application.
- A clear warranty that addresses delamination and yellowing rather than excluding every meaningful failure mode.
This process works for homeowners, builders, designers, and project managers coordinating work across Fairfield, New Haven, and Hartford counties. CP Painting Company's service image can help you identify the company while comparing local proposals, but the same technical checklist should govern every contractor you consider.
The garage floor category remains underpenetrated, with residential concrete floor coatings growing roughly 9% annually since 2015 and projected market coverage pointing toward about 10% annual growth through 2035, according to market coverage on residential concrete coatings. That opportunity attracts capable installers and rushed operators alike. Your protection is simple: diagnose the slab first, specify the prep, and make the contractor prove the system fits the concrete.
CP Painting Company offers garage floor coating work with a prep-first approach, including system selection, surface preparation, and finish application for Connecticut properties. Visit CP Painting Company to request an estimate and discuss your slab condition, moisture concerns, coating options, and project requirements before choosing a finish.


